-
Delete the WOString elements below the horizontal line in the Main component, because you'll be replacing them with a table. Select the WOString elements and choose Cut from the Edit menu to delete them.
-
Click the
 button.
The New Table panel appears. On the right is the Preview pane, which displays what your table will look like.
-
In the Columns field, type 3 and press Enter. A third column appears in the preview pane.
-
In the Border field, enter 1. A border appears around the table in the preview pane.
-
Click "First row cells are header cells (<TH>)". The top row text becomes bold in the preview pane.
-
Click OK. The table appears in your page.
-
Select the upper-left cell of the table by clicking it.
-
Change the text in the cell to Name.
-
Open the Inspector if it is not already open.
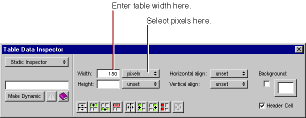
The Inspector presents a number of modifiable settings that apply to the table cell you've selected.
-
Select pixels from the Width pop-up list. Enter 150 in the Width field.
The width of the column is set to 150 pixels.
-
Click in the component window, then press Tab.
Pressing Tab when editing a table causes the contents of the next cell to the right to be selected (or the first cell of the next row if in the rightmost column). Pressing Shift-Tab moves in the opposite direction through the table.
-
Repeat steps 8 through 11 for the second and third cells of the top row. Label the middle column E-mail and set its width to 150 pixels. Label the third column Comments and leave its width unset. (The comments field takes up the remainder of the width of the table.)
Note: It isn't necessary to adjust the height of the columns--if left unset, they'll expand at runtime to accommodate the size of the text being displayed.
 button.
